Your face cleaning brush is an investment in your skincare routine, but without proper cleaning and maintenance, it can become a breeding ground for bacteria. This comprehensive guide will teach you exactly how to clean your face brush, maintain it properly, and maximize its lifespan for healthier, clearer skin.
Why Cleaning Your Face Brush is Crucial
Many people invest in quality face cleaning brushes but overlook the most critical aspect: regular cleaning. Understanding why this matters is the first step to better skincare habits.
The Hidden Dangers of Dirty Brush Heads
Every time you use your face brush, it collects:
- Dead skin cells that accumulate on the bristles
- Makeup residue from your daily cleansing routine
- Excess oil and sebum from your skin
- Cleanser buildup that doesn’t fully rinse away
- Environmental pollutants transferred from your skin
Bacteria Buildup Risks
According to dermatological studies, a dirty face brush can harbor harmful bacteria within just 24-48 hours of use. Here’s what can happen:
Skin Problems Caused by Dirty Brushes:
- Acne breakouts: Bacteria transfer back to your skin, clogging pores and causing inflammation
- Skin infections: Staph bacteria and other pathogens can multiply on damp brush heads
- Irritation and redness: Old product buildup can irritate sensitive skin
- Reduced effectiveness: Clogged bristles can’t clean your skin properly
- Premature aging: Bacterial inflammation can accelerate skin aging
Expert Insight: “I’ve seen countless patients with persistent acne that cleared up simply by properly cleaning their facial cleansing devices. A dirty brush is essentially rubbing bacteria back into your pores.” – Dr. Emily Roberts, Board-Certified Dermatologist
Shocking Statistics:
- Studies show that 72% of people don’t clean their face brushes regularly
- A dirty face brush can contain more bacteria than a toilet seat
- Bacteria can multiply by 1000x within 48 hours on a damp brush head
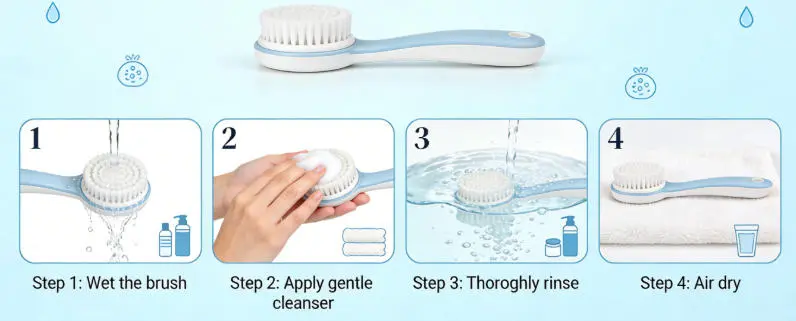
Daily Cleaning Routine: After Every Use
The key to maintaining a hygienic face brush is establishing a simple daily cleaning routine. This takes less than 2 minutes but makes a huge difference.
Step 1: Rinse Immediately After Each Use
What to do:
- Turn on lukewarm water (not hot, as it can damage bristles)
- Hold the brush head under running water
- Gently massage the bristles with your fingers
- Continue rinsing until water runs clear
- Check for any visible residue or product buildup
Why lukewarm water? Hot water can:
- Damage synthetic bristles
- Loosen the glue holding bristles in place
- Warp silicone brush heads
- Reduce the lifespan of your device
Pro tip: Rinse the brush head while it’s still wet from use. Dried-on residue is much harder to remove.
Step 2: Remove Excess Water
Proper technique:
- Gently shake the brush head to remove excess water
- Pat (don’t rub) with a clean towel
- For electric brushes, remove the brush head and shake both parts
- Wipe down the handle if it got wet
What NOT to do:
- Don’t squeeze or twist bristles forcefully
- Don’t use a hair dryer or heat source
- Don’t leave standing in water
- Don’t store while still dripping wet
Step 3: Air Dry Properly
Best drying practices:
1. Position Matters:
- Upright position: Store brush head facing up to allow water to drain away from the motor
- Bristles down: If possible, hang or position bristles downward for faster drying
- Separated parts: Remove brush head from handle for better air circulation
2. Location is Key:
- Choose a well-ventilated area
- Avoid enclosed cabinets or drawers
- Keep away from the shower (too humid)
- Use a brush holder or stand if available
3. Drying Time:
- Allow 4-6 hours for complete drying
- Don’t use again until fully dry
- Consider having two brush heads to rotate
Quick Tip: Place your brush near a window or fan for faster drying, but avoid direct sunlight which can degrade materials over time.
Deep Cleaning Methods: Weekly and Monthly Maintenance
While daily rinsing is essential, your face brush needs deeper cleaning to remove stubborn buildup and sanitize thoroughly.
Weekly Deep Clean with Soap
What you’ll need:
- Gentle antibacterial soap or baby shampoo
- Small bowl or cup
- Lukewarm water
- Clean towel
Step-by-step process:
- Prepare cleaning solution
- Fill a small bowl with lukewarm water
- Add 2-3 drops of gentle soap
- Mix until slightly sudsy
- Soak the brush head
- Remove brush head from handle
- Submerge in soapy water for 30-60 seconds
- Don’t soak longer than 2 minutes
- Gently massage bristles
- Use your fingers to work soap through bristles
- Pay attention to the base where buildup accumulates
- Use circular motions to loosen debris
- Rinse thoroughly
- Hold under running lukewarm water
- Continue rinsing until no soap remains
- Squeeze gently to remove soap from deep within bristles
- Dry completely
- Shake off excess water
- Pat with clean towel
- Air dry in upright position
Best soaps to use:
- Baby shampoo: Gentle and effective
- Antibacterial hand soap: Kills bacteria without harsh chemicals
- Castile soap: Natural and non-toxic
- Brush cleaning solution: Specially formulated products
Avoid these products:
- Harsh detergents
- Bleach or chlorine-based cleaners
- Alcohol-based solutions (can dry out bristles)
- Abrasive scrubs
Monthly Sanitization Techniques
Once a month, give your face brush a deep sanitization to eliminate any lingering bacteria and keep it in optimal condition.
Method 1: Vinegar Soak (Natural Disinfectant)
Ingredients:
- 1 part white vinegar
- 2 parts water
- Small bowl
Instructions:
- Mix vinegar and water in a bowl
- Submerge brush head for 5-10 minutes
- Rinse thoroughly with clean water
- Air dry completely
Benefits:
- Natural antibacterial properties
- Removes mineral deposits from hard water
- Eliminates odors
- Safe for all brush types
Method 2: Hydrogen Peroxide Solution
Ingredients:
- 3% hydrogen peroxide
- Equal parts water
Instructions:
- Mix equal parts hydrogen peroxide and water
- Soak brush head for 5 minutes
- Rinse thoroughly
- Dry completely before use
Benefits:
- Powerful disinfectant
- Kills 99.9% of bacteria
- Safe and non-toxic
- Affordable solution
Method 3: Tea Tree Oil Treatment
Ingredients:
- 5-7 drops tea tree essential oil
- 1 cup warm water
- 1 teaspoon gentle soap
Instructions:
- Mix all ingredients in a bowl
- Soak brush head for 10 minutes
- Gently massage bristles
- Rinse thoroughly with clean water
- Air dry completely
Benefits:
- Natural antimicrobial properties
- Pleasant scent
- Gentle on bristles
- Prevents mold and mildew
Safety Note: Never use undiluted tea tree oil directly on brush heads. Always dilute properly to avoid damaging materials.
Method 4: UV Sanitizer (High-Tech Option)
If you want the most thorough sanitization:
- Use a UV sanitizer box designed for beauty tools
- Place clean, dry brush head inside
- Run sanitization cycle (usually 5-10 minutes)
- Store or use immediately
Pros:
- Kills 99.99% of bacteria and viruses
- No chemicals needed
- Quick and convenient
- Safe for all materials
Cons:
- Requires purchasing UV device ($30-$80)
- Needs electricity
- Not portable
Brush Head Replacement: When and Why
Even with perfect cleaning habits, brush heads don’t last forever. Knowing when to replace them is crucial for effective skincare.
The 3-Month Rule
General guideline: Replace your face brush head every 3 months, similar to toothbrush recommendations.
Why 3 months?
- Bristles lose their effectiveness over time
- Microscopic wear creates hiding spots for bacteria
- Cleaning power diminishes significantly
- Material degradation occurs naturally
Usage-based timeline:
| Usage Frequency | Replacement Schedule |
|---|---|
| Twice daily | Every 2 months |
| Once daily | Every 3 months |
| Every other day | Every 4 months |
| 2-3 times per week | Every 5-6 months |
Signs of Wear and Tear
Replace your brush head immediately if you notice any of these warning signs:
Visual Signs:
- Splayed bristles: Bristles pointing in different directions
- Discoloration: Yellowing or darkening of bristles
- Fraying: Individual bristles breaking or splitting
- Bent shape: Brush head no longer maintains original form
- Staining: Permanent discoloration that won’t wash out
- Mold or mildew: Black or green spots (replace immediately!)
Performance Signs:
- Reduced cleaning effectiveness
- Bristles feel rough or scratchy
- Brush doesn’t lather cleanser well
- Skin feels irritated after use
- Takes longer to clean your face
Hygiene Signs:
- Persistent odor even after cleaning
- Increased breakouts or skin issues
- Visible buildup that won’t rinse away
- Bristles feel slimy or sticky
Pro Tip: Mark your calendar or set a phone reminder when you install a new brush head. This ensures you never forget to replace it on time.
How to Properly Replace Brush Heads
Step-by-step:
- Remove old brush head
- Turn off and unplug device
- Twist or pull off old head (check manufacturer instructions)
- Dispose of properly
- Clean the attachment point
- Wipe down the connection area
- Remove any residue or buildup
- Ensure it’s completely dry
- Attach new brush head
- Align properly with device
- Push or twist until secure
- Test that it’s firmly attached
- Test before use
- Turn on device briefly
- Ensure no wobbling or loose connection
- Check that rotation/vibration is smooth
Where to buy replacement heads:
- Manufacturer’s official website (best quality guarantee)
- Amazon or major retailers
- Beauty supply stores
- Pharmacy chains
Cost-saving tips:
- Buy multi-packs for better value
- Subscribe and save options (10-15% discount)
- Watch for sales during holidays
- Consider generic compatible heads (check reviews first)
Storage Tips for Maximum Hygiene
Proper storage is just as important as cleaning. Where and how you store your face brush directly impacts bacterial growth and brush longevity.
Proper Drying Position
Best storage positions:
1. Upright Stand (Recommended)
- Keeps brush head elevated
- Allows water to drain away from motor
- Promotes air circulation
- Prevents contact with contaminated surfaces
2. Wall-Mounted Holder
- Saves counter space
- Keeps brush away from splashes
- Excellent air circulation
- Hygienic and convenient
3. Dedicated Brush Holder
- Designed specifically for face brushes
- Often includes drainage holes
- Keeps brush stable and secure
- Available in various styles
Storage positions to AVOID:
- ❌ Laying flat on counter (bristles stay damp)
- ❌ In a closed drawer (no air circulation)
- ❌ Inside a cabinet (too humid)
- ❌ In the shower (constant moisture exposure)
- ❌ In a travel case while damp (mold risk)
- ❌ Near the toilet (bacterial contamination)
Avoid Humid Environments
Why humidity matters:
- Bacteria thrive in moist environments
- Mold and mildew grow faster in humidity
- Bristles take longer to dry
- Electronic components can be damaged
Ideal storage conditions:
- Temperature: Room temperature (65-75°F / 18-24°C)
- Humidity: Below 60% relative humidity
- Ventilation: Good air flow
- Light: Indirect light (avoid direct sunlight)
Bathroom storage solutions:
Since most people store brushes in bathrooms (naturally humid), here’s how to minimize moisture:
- Use exhaust fan
- Run during and after showers
- Leave on for 20-30 minutes after bathing
- Reduces overall bathroom humidity
- Open windows
- Allow fresh air circulation
- Reduces moisture buildup
- Prevents mold growth
- Keep away from shower
- Store on opposite side of bathroom
- Avoid direct steam exposure
- Use a shelf or counter away from water sources
- Consider a dehumidifier
- Small bathroom dehumidifiers available
- Maintains optimal humidity levels
- Protects all beauty tools
Travel Storage Tips
When traveling with your face brush:
Before packing:
- Clean and sanitize thoroughly
- Allow to dry completely (24 hours if possible)
- Remove brush head from handle
- Store separately if space allows
Packing method:
- Use a ventilated travel case (not sealed plastic)
- Wrap brush head in clean paper towel
- Keep handle and head separate
- Pack in outer compartment for air access
At your destination:
- Remove from travel case immediately
- Store in upright position
- Clean daily as usual
- Ensure proper drying between uses
Travel Hack: Bring a small plastic cup to use as a makeshift brush holder in hotel bathrooms. Turn it upside down and place your brush on top for elevated storage.
Common Cleaning Mistakes to Avoid
Even with good intentions, many people make these common mistakes that can damage their brush or reduce its effectiveness:
Mistake #1: Using Hot Water
Why it’s bad: Damages bristles, loosens glue, warps materials
Solution: Always use lukewarm or cool water
Mistake #2: Soaking Too Long
Why it’s bad: Water seeps into motor housing, damages electronics
Solution: Limit soaking to 1-2 minutes maximum
Mistake #3: Not Cleaning Daily
Why it’s bad: Bacteria multiply rapidly, buildup becomes harder to remove
Solution: Rinse after every single use, no exceptions
Mistake #4: Storing While Wet
Why it’s bad: Creates perfect environment for mold and bacteria
Solution: Always allow complete drying before storage
Mistake #5: Sharing Your Brush
Why it’s bad: Transfers bacteria, skin conditions, and infections
Solution: Never share, even with family members
Mistake #6: Using Harsh Chemicals
Why it’s bad: Degrades materials, leaves toxic residue
Solution: Stick to gentle, skin-safe cleaning products
Mistake #7: Forgetting to Replace
Why it’s bad: Worn brushes harbor more bacteria, clean less effectively
Solution: Set calendar reminders for 3-month replacement
Quick Reference Cleaning Schedule
Keep this schedule handy for easy reference:
| Frequency | Task | Time Required |
|---|---|---|
| After every use | Rinse thoroughly, shake dry, air dry upright | 2 minutes |
| Weekly | Deep clean with soap, thorough rinse, complete drying | 5 minutes |
| Monthly | Sanitize with vinegar/hydrogen peroxide/tea tree oil | 15 minutes |
| Every 3 months | Replace brush head | 2 minutes |
| As needed | Clean handle and device body | 3 minutes |
Frequently Asked Questions
Q: Can I put my face brush head in the dishwasher?
A: No, never put face brush heads in the dishwasher. The high heat and harsh detergents will damage the bristles and potentially melt plastic components. Always hand wash with gentle soap.
Q: How do I know if my brush is truly clean?
A: A clean brush should have no visible residue, smell neutral (not musty or sour), and have bristles that feel soft and clean to the touch. Water should run clear when rinsing.
Q: Can I use rubbing alcohol to clean my face brush?
A: While alcohol is antibacterial, it can dry out and damage bristles over time. It’s better to use gentle soap and water for regular cleaning, reserving alcohol for occasional deep sanitization (diluted 50/50 with water).
Q: My brush smells bad even after cleaning. What should I do?
A: A persistent odor usually indicates deep bacterial growth or mold. Try a vinegar soak or hydrogen peroxide treatment. If the smell persists, it’s time to replace the brush head.
Q: Is it safe to share a face brush if I clean it first?
A: No, never share face brushes even after cleaning. Bacteria and viruses can survive in microscopic crevices, and sharing can transmit skin conditions, infections, and diseases.
Q: Can I use my regular facial cleanser to clean the brush?
A: Yes, your regular facial cleanser works well for daily rinsing. However, for weekly deep cleaning, use a more thorough cleanser like baby shampoo or antibacterial soap.
Q: How long should I let my brush dry before using it again?
A: Allow at least 4-6 hours for complete drying. Ideally, clean your brush after your evening routine so it has all night to dry before morning use.
Q: Do silicone brushes need less cleaning than bristle brushes?
A: While silicone is naturally more resistant to bacteria, it still requires the same cleaning routine. Silicone brushes may be easier to clean but need equal attention to hygiene.
Conclusion
Maintaining a clean face brush is one of the simplest yet most impactful steps you can take for healthier skin. By following this comprehensive maintenance guide, you’ll:
- Prevent breakouts and infections caused by bacterial buildup
- Extend the life of your device through proper care
- Maximize cleaning effectiveness with well-maintained bristles
- Protect your skincare investment with regular maintenance
- Enjoy clearer, healthier skin from hygienic cleansing
Remember the key principles:
- Rinse after every single use
- Deep clean weekly with gentle soap
- Sanitize monthly with natural solutions
- Replace brush heads every 3 months
- Store in a dry, well-ventilated area
- Never share your brush with others
Your face brush is a powerful tool for beautiful skin, but only when properly maintained. Make these cleaning habits part of your routine, and your skin will thank you with a clearer, more radiant complexion.
Last updated: February 17, 2026
Medical review: Board-certified dermatologists
Reading time: 14 minutes
Disclaimer: This article is for informational purposes only and does not constitute medical advice. If you experience persistent skin issues or infections, consult a dermatologist. Always follow manufacturer instructions for your specific face brush model.
All Comments 0
Please log in to post a comment.
No comments yet. Be the first to share your thoughts!